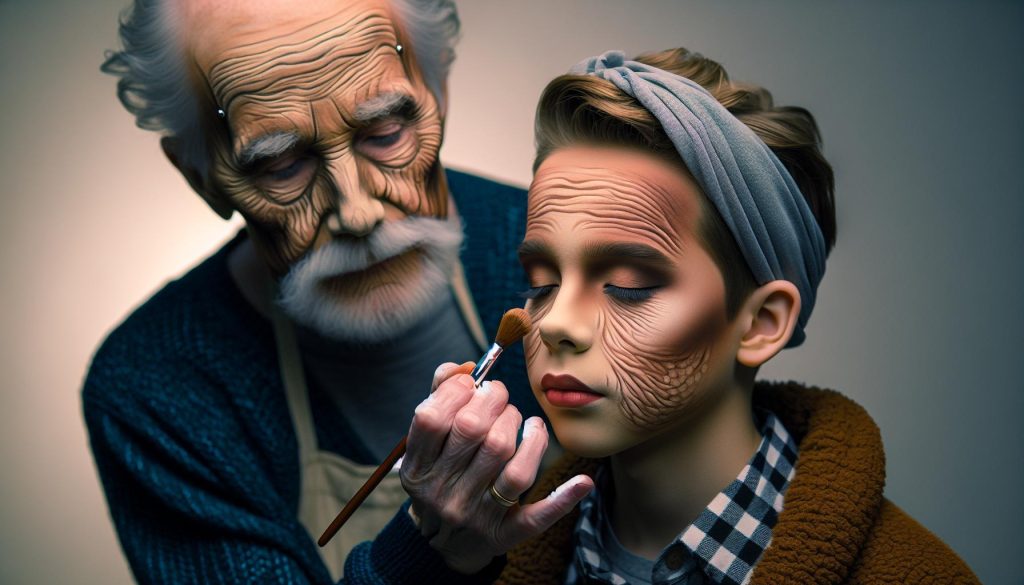
Creating a fun and believable aged look for a child can be a playful twist for events like Halloween or school performances. Whether you’re preparing for a theatrical production or just indulging in imaginative play, mastering makeup techniques to achieve this effect can transform the experience. It’s not just about applying makeup; it’s about creatively using techniques to enhance features and add character.
Throughout this guide, we’ll explore practical steps and effective products, breaking down the process into manageable techniques that anyone can follow, no matter their experience level. By the end, you’ll feel confident in your ability to give a child that charmingly aged appearance, ensuring a memorable and entertaining transformation. Let’s dive into the world of age-defying makeup magic!
Understanding the Basics of Aging Makeup Techniques
To transform a child’s appearance to look older through makeup, it’s essential to understand the fundamental principles of aging makeup techniques. The goal is to create an authentic aged look, emphasizing features that convey maturity and wisdom while considering the unique characteristics of a child’s skin.
Aging is often associated with texture, shadowing, and subtle coloration changes. The skin of a young person is typically smooth and supple, so incorporating techniques to fake the appearance of wrinkles and sagging will be crucial. Start by using a lighter foundation to mimic the natural skin tone, as applying a heavier product can make the skin appear smoother, which contradicts the aging effect.
For realistic aging effects, consider the following strategies:
- Texture Application: Employ a textured sponge or stippling brush to create unevenness, subtly replicating the bumps and puffiness seen in older skin.
- Shadowing Techniques: Use matte eyeshadows to darken areas around the eyes, nose, and mouth. These shadows simulate hollows and give depth, creating a more aged visage.
- Highlighting Features: Focus on high points like cheekbones and brow lines. Use a lighter shade to draw attention here, suggesting a more dynamic structure that contrasts with added shadowing.
As you practice these techniques, remember that less is often more. Start with a light touch and gradually build upon your layers, observing how each application interacts with the skin’s natural appearance. This method not only allows for control over the final look but also fosters a realistic representation of aging without overwhelming the youthful essence of the child’s face.
Essential Tools for Creating Age Effects
To effectively create age effects in makeup, having the right tools is essential. These tools not only facilitate the application process but also contribute significantly to achieving a realistic and convincing aged appearance. Here’s a closer look at what you’ll need to get started.
Start with a good quality foundation that matches the desired aged look. A lighter, more matte finish can help mimic the texture of older skin. Pair it with a stipple brush or a textured sponge; these tools are perfect for creating unevenness and simulating the natural bumps of aging skin. Rather than sweeping the brush, opt for a dabbing motion, which will allow for greater control in building up the layers.
Next, you’ll need an array of eyeshadow brushes. Smaller, tapered brushes can be used for detailed shadowing around the eyes and mouth. Using a mix of light and dark matte eyeshadows, you can emphasize hollows and wrinkles. Having a good blending brush is crucial as well; it helps to soften any harsh lines created during the shading process, making your aging effects look more natural.
Don’t forget about highlighters and contour products. A cream or liquid highlighter can be used on high points of the face, while a contour stick can help to create the illusion of sagging skin by applying subtle shadows along the jawline and cheeks. For these products, a foundation brush or your fingers can work well, allowing for a more nuanced application.
Lastly, consider having on hand a set of makeup removers. This could include micellar water or cleansing wipes, as removing age makeup after application can be more labor-intensive-it’s all about being gentle and ensuring the skin remains in good condition.
By equipping yourself with these essential tools, you’ll be well on your way to creating a convincing aged look that is both fun to explore and pleasant to apply. Happy aging!
Step-by-Step Guide: Applying Makeup for an Older Look
To create an aged appearance in makeup, whether for an event or a creative project, following a thoughtful and methodical approach is key. Not only does this involve using the right products, but understanding how to manipulate those products to mimic the features of older skin and facial structures is crucial. Here’s a straightforward guide to help you achieve that desired older look effectively.
Start with a solid skin preparation routine. Cleanse the skin thoroughly and follow up with a hydrating moisturizer. This sets a good foundation for the makeup and allows for better product adherence. Apply a lightweight primer to help smooth out the skin’s surface, which can reduce the appearance of fine lines and provide a base for your foundation.
Next, select a foundation that is lighter and has a matte finish. Using a stipple brush or a textured sponge, dab the foundation onto the skin instead of dragging it across to create a less even, more natural look, similar to aging skin. Focus on areas where skin is likely to have uneven pigmentation, like around the nose and forehead.
As you move on to color products, consider a shading approach. Use a taupe or gray-toned contour product to create shadows under the cheekbones and along the jawline. This illusion of depth can be key to replicating the look of sagging skin. Using a small, precise brush, apply this contour in small amounts, building up color gradually to ensure you achieve a natural effect.
The eyes are significant in portraying age as they often reflect tiredness and texture changes. Apply a light taupe or gray eyeshadow over the lids and into the creases, blending well. Use a darker shade (like dark brown) to define the outer corners and lower lash line to create a shadowy effect, signifying hollowness or deep-set eyes. Complete the look with a few coats of mascara, focusing on building length rather than volume, as older lashes tend to be thinner.
Finally, finish with details that define age: use a fine-tipped liner to create faint crow’s feet at the corners of the eyes, and apply a dab of a white or cream highlighter on the cheekbones for a more youthful flush. For the lips, opt for muted tones; a nude shade that mimics naturally aged lips can tie the look together. Remember, the goal is to create layers of texture and shadow, akin to the natural signs of aging.
With each step, responsiveness and adjustment are essential. Take the time to assess your application under various lighting conditions to ensure it looks consistent and realistic. The play between light and shadow will be your best ally in achieving this nuanced look. Happy aging!
Mastering Skin Prep: Achieving the Perfect Base
To create an authentic aged look through makeup, effective skin preparation is crucial. This step lays the groundwork for your aging techniques, allowing the makeup to adhere properly and mimic the natural textures and tones of older skin. The right preparation can make all the difference between a convincing aged appearance and one that feels artificial.
Begin by thoroughly cleansing the skin. Use a gentle cleanser, as you want to avoid stripping away moisture, which is important for creating a healthy base. After cleansing, applying a hydrating moisturizer is vital. Opt for a product that offers long-lasting hydration, as older skin typically has less moisture. Use a dime-sized amount, warming it between your fingers before gently massaging it into the skin using upward circular motions. This not only hydrates but also increases blood circulation, which can help give a healthy glow.
Following hydration, introducing a lightweight primer can significantly improve the application and longevity of your makeup. Look for a mattifying or smoothing primer that fills in fine lines and creates an even surface. Apply it using your fingers or a brush, focusing on areas where the skin texture is uneven. This step is foundational; it helps the makeup mimic the uneven tones and textures often found in older skin without emphasizing flaws.
Once your skin is prepped with moisturizer and primer, it’s essential to assess the skin’s surface. If there are areas of redness or uneven color, consider applying a color-correcting product, such as a green-tinted primer to neutralize redness. This attention to detail will enhance the realism of the aged look you’re aiming to achieve. Remember, the smoother and more even your base is, the easier it will be to apply the subsequent layers of makeup effectively.
Achieving the perfect base requires patience and attention to detail, but it is well worth the effort. Good skin prep is not just about looking good in photos; it is about creating a canvas that allows your artistry to shine. With these foundational steps covered, you’ll be ready to move on to the exciting process of applying makeup that convincingly portrays age. Embrace the journey and have fun creating!
Age-Enhancing Features: Emphasizing Wrinkles and Texture
To convincingly emphasize aging features on a child’s face, you can use techniques that create the illusion of wrinkles and skin texture typical of older adults. A thoughtful application of makeup can transform a youthful visage into one that appears aged, allowing for a playful, theatrical, or artistic expression. This process focuses on creating depth and realism through strategic highlight and shadow.
Start by using a thin layer of cream foundation several shades lighter than the child’s natural skin tone. This will serve as a base that mimics the pallor often associated with aging skin. Apply this foundation with a damp makeup sponge for an even finish. Next, introduce a slightly darker cream or gel product to create the appearance of wrinkles. Choose a shade that is one or two tones deeper than the base you just applied. Using a fine-tip brush, apply this warmer shade into areas where natural wrinkles would form, such as:
- Forehead wrinkles (horizontal lines)
- Under the eyes to create the look of bags
- Around the mouth for deeper laugh lines
- On the neck for added texture
Blend these lines outwards, ensuring they don’t look too stark. You want subtlety that adds character without overwhelming the base.
Next, focus on enhancing the texture of the skin to mimic that aged look. Use a translucent powder to set the foundation, but don’t overdo it; a light touch will do. This will not only help the makeup last longer but also provide a slightly drier finish that echoes older skin. To create added texture, you can use a stippling technique with a clean makeup sponge and a touch of highlighter on areas like the cheeks and forehead. This contrast will enhance the depth of shadows created by the darker color.
For a final touch, don’t forget the lips. Aging often results in thinner, less vibrant lips, so a matte lip color in a muted shade can help. Apply it slightly outside the natural lip line to enhance the aging effect, then blot it with a tissue for a more faded appearance. This layered approach will ensure that the details of aging stand out, creating a believable transformation while engaging the viewer’s imagination.
Remember, the goal is to create a gentle, humorous, or theatrical portrayal of aging, so feel free to experiment and have fun with the process! By strategically emphasizing wrinkles and skin texture, you’ll excel in making the transformation not just convincing but also enjoyable.
Choosing the Right Colors: Palette for an Aged Appearance
Choosing the right colors when crafting an aged appearance can make all the difference in achieving a realistic and effective look. The colors you select will not only highlight features but also create depth and mimic the natural variations found in older skin. Think about desaturated and muted tones that reflect the subtle shifts in skin color as we age. Instead of bright and vibrant shades that youthfully pop, you’ll want to explore palettes that evoke a sense of maturity and authenticity.
Start with foundation selections. A cream foundation that is one to two shades lighter than the child’s natural tone serves as the perfect base. This lightness mimics the typical paleness associated with aging skin. Pair it with a slightly deeper cream or gel product for shadowing-this should be one or two shades darker than your base. For cheek color, choose soft peach or muted pinks instead of bold reds. These toned-down hues not only represent the loss of vibrancy in aging skin but also blend seamlessly into the transitional nature of the makeup look.
For eyes, opt for earthy shades like browns or soft grays. These colors add dimension and enhance the appearance of eye hollows, which often become more pronounced with age. To approximate the look of thinner lips, use a soft, matte lip color in muted tones such as taupe or dusty rose, avoiding bright reds or pinks which can clash with the overall aged effect.
In addition to these considerations, it’s crucial to think about how to layer and apply these colors. Always blend well, as harsh lines can break the illusion. Using a stippling technique can help create a more natural, textured finish. Overall, approach the color palette with a gentle hand and an eye for subtlety, fostering a rich mix that celebrates the beauty of aging while ensuring your artistic expression remains engaging and playful.
Aging Eyes: Techniques to Add Depth and Dimension
To create the illusion of aging around the eyes, the goal is to enhance and deepen features, mimicking the natural changes that occur with age. One effective technique is to apply matte shadows in muted tones-think deep browns, taupes, or ash grays-around the eye area. Start by using a medium-sized brush to apply a darker eyeshadow in the crease of the eyelid and blending it well to create depth. This method gives the appearance of hollows that often develop as we age.
Another strategy involves emphasizing eyelid texture. Use a fine shimmer or glitter eyeshadow on the eyelids to contrast with matte finishes; the light catches on these areas, mimicking the drier skin texture of older individuals. Apply this with a light hand, tapping the color on rather than sweeping it to maintain control and precision. Adding a thin line of soft eyeliner along the upper lash line can also lend the eyes a more defined and framed look, which can help highlight the contrast between the lighter eyelid and a deeper crease.
Don’t forget about the lower lash line; this area can also sag or appear less defined with age. Carefully apply a muted shadow to the lower lash line and smudge it slightly for a softer effect. This not only adds dimension but also helps to create that characteristic, shadowy appearance associated with older eyes.
To finish off the look, use mascara judiciously. Though you want to avoid the heavy, clumpy appearance that often comes with multiple coats, a light application focusing on lengthening rather than thickening will open up the eyes. And remember, eyebrows play a significant role in framing the face. For an aged look, you might want to thin the eyebrows slightly or use a soft pencil to create a faded appearance, reminiscent of the wear and tear that comes with the passage of time.
By implementing these techniques, you can successfully create age-appropriate depth and dimension in the eyes that reflects the beauty of aging while ensuring your artistic expression shines through.
Realistic Beard and Hair Effects for Authentic Aging
Creating a believable aged look goes beyond just techniques for the face; the hair and facial hair also play crucial roles in transforming a youthful appearance into something authentically aged. Many people notice the distinct changes that happen to hair as we age, whether it’s the introduction of gray strands, a thinner texture, or even bald patches. By effectively simulating these aspects, you can enhance the aged illusion for a child or any subject you’re working with.
To achieve realistic beard and hair effects, consider using temporary hair color sprays or powders specifically designed for this purpose. Gray or white hair color sprays can instantly transform dark hair, mimicking the graying process. Apply the spray sparingly and build it up layer by layer to avoid an overly uniform look, which can appear artificial. On the other hand, if you want to add texture, hair fibers or thickening sprays can be effective in adding volume and making hair appear coarser, akin to aging hair that often becomes less dense over time.
When it comes to facial hair, creating a realistic aged beard depends on texture and color. For a child, using a faux beard made of gray or white fibers can work wonders. These fibers can be glued to the skin using a safe adhesive like medical-grade adhesive or eyelash glue. For a more playful approach, consider using face paint or makeup, mixing dark brown with white to create a salt-and-pepper effect. Apply it with a stippling tool for a more natural, uneven appearance, which brings authenticity to the look.
Another tip is to emphasize the imperfections that naturally occur with aging. Fine lines can also be drawn in using fine face-painting brushes or makeup pens to define areas around the chin or cheeks where hair might grow thinner, contributing to an aged countenance. The key to a great aged effect is layering-start with the base and gradually build details to enhance realism. Remember, aging isn’t just about adding gray; it’s also about capturing the complexities and variations that come with age.
Enhancing Jawline and Cheeks to Create Definition
Creating a realistic aged appearance requires careful attention to the jawline and cheeks, as these areas significantly contribute to the overall definition of the face. As we age, gravitational effects can cause the skin to sag, leading to a more pronounced jawline and flatter cheeks. To simulate these changes effectively while aging a child’s look, you can utilize strategic contouring and highlighting techniques.
Start by defining the jawline. Use a matte bronzer or contour powder that is a couple of shades darker than the skin tone. Apply it along the natural jawline, from the ear toward the chin, using a fluffy brush for a soft blend. The goal is to create shadows that suggest a more angular structure, reminiscent of an older appearance. Aim for a natural-looking gradient rather than a harsh line-smudging with a clean brush can achieve this seamlessly. Don’t forget to contour the area just below the chin; this will add to the illusion of age, emphasizing the transition from jaw to neck.
Next, focus on enhancing the cheeks. Older skin tends to lose volume and appear flatter, so you can mimic this by deepening the area below the cheekbones. Using the same bronzer or a slightly cooler shade, trace under the cheekbones using a precise brush. Blend well to avoid stark contrasts, but leave the apples of the cheeks as they are to create lift; this subtle highlight will also give the illusion of natural fullness that complements the aged look.
Finally, seal the makeup with a translucent setting powder to ensure it lasts throughout any event. This will help maintain the desired effect without making the skin look overly shiny or young. Remember that balance is key. Not every child will have the same features, so adjust the intensity of your contouring based on individual facial structure. Testing makeup under different lighting conditions can also help you see how it will appear in various environments, ensuring a realistic finish that enhances the character’s age.
Common Mistakes to Avoid When Aging a Look
When attempting to create an aged appearance with makeup, it’s easy to make mistakes that can undermine your efforts. Avoid these common pitfalls to ensure a convincing transformation that feels authentic rather than exaggerated.
One frequent error is using products that are too heavy or thick, which can overshadow the delicate skin texture of a child. Instead, opt for lightweight foundations and creams that allow for buildable coverage. Ideally, select a formula that mimics skin’s natural sheen for a more believable effect. Always start with a well-hydrated base; this will help the makeup meld into the skin rather than sit on top.
Another misstep is neglecting the importance of blending. Harsh lines can draw attention away from the intended effect, making the aging process seem artificial. When contouring, for instance, blend thoroughly to create seamless shadows that contour the face without stark demarcations. Using a damp makeup sponge or a soft brush can help achieve this smooth finish.
Color choice is also crucial. Too bright or youthful shades can conflict with the aged look you’re aiming for. Instead of bright blushes or vibrant lip colors, choose muted tones that reflect a more aged palette. Take the time to test different colors against the skin to ensure they complement the overall aged effect without seeming out of place.
Finally, resist the urge to overdo the effects. It’s tempting to pile on age-altering products like wrinkles and texture, but moderation is key. Focus on enhancing certain features-like shadows on the jawline and subtle fine lines around the eyes-rather than trying to cover every inch of the face. A less is more approach will often yield a more realistic and relatable aged appearance.
By avoiding these mistakes, you can create a makeup look that is both effective and believable, evoking the essence of aging while still respecting the child’s natural features.
Tips for Removing Makeup Safely after Application
After transforming a child’s look with aging makeup, safely removing it is crucial to ensure skin remains healthy and hydrated. Using the right techniques and products can help achieve a clean slate without irritation or damage to delicate skin.
Start by gathering your supplies: a gentle makeup remover, cotton pads, and potentially a soothing moisturizer. Gentle wipes designed for sensitive skin can be effective for basic makeup removal, while oil-based removers or micellar water are ideal for breaking down heavier makeup products typically used for aging effects. Apply a small amount of the remover onto a cotton pad; if using an oil-based product, a dime-sized amount should suffice.
To remove the makeup, gently press the soaked cotton pad against the skin for about 10-15 seconds to allow the product to dissolve the makeup, especially around eyes and other areas where products may be more stubborn. Then, wipe away in a downward motion, working from the forehead down to avoid pulling on the skin. Avoid vigorous scrubbing, as delicate skin requires a softer touch. If necessary, repeat the process with a fresh cotton pad until all traces of makeup are gone.
Once the makeup is removed, cleanse the face thoroughly with a mild cleanser suitable for children or sensitive skin. This helps to eliminate any residual makeup or cleanser left on the skin. Follow up with a nourishing moisturizer to hydrate and soothe the skin, restoring its natural barrier. Ingredients like aloe vera or chamomile can be beneficial for calming any potential irritation.
By prioritizing gentle removal techniques and using appropriate products, you can protect the skin and prevent dryness or discomfort, leaving it healthy and fresh after your creativity with makeup. Make it a fun ritual by involving the child; they can help choose the products or even assist with the gentle removal process, turning it into a bonding experience.
Creative Aging Makeup Ideas for Special Events
Creating an aged appearance for special events can be a thrilling challenge that invites creativity and playful experimentation. Imagine transforming a child’s look with clever fading techniques, texturing effects, or even whimsical touches that bring out an older persona for a themed party or a theatrical performance. The key is to blend artistry with sensitivity, catering to the child’s comfort and enjoyment throughout the process.
To achieve an aged look, consider using items that you likely have at home or are easy to find. An excellent starting point is special effects makeup, which can include simple foundation shades that are a few tones darker or lighter than their natural skin to mimic the changes that come with age. A powdered foundation works well to create that desired texture and to emphasize fine lines; simply apply it with a gentle sponge, focusing on areas you want to age, such as around the eyes and mouth.
Creative Techniques
- Wrinkle Simulation: Use a fine line or a gel-based eyeliner to draw subtle, short lines around the eyes or mouth. Smudge them slightly for a softer effect.
- Age Spots: You can dab small amounts of brown or tawny face paint onto the skin using a makeup sponge or your fingertip to create realistic age spots. Position them on the hands, forehead, and cheeks.
- Texture Play: For added dimension, use stippling sponges to add rough textures. These can create the illusion of sagging skin or pronounced pores.
- Accentuating Features: Highlighting certain features like cheekbones and jawlines with bronzers or dark contouring can create a more defined look, often associated with mature skin.
- Accessorizing: Integrate accessories like glasses with a retro flair, a wig, or even a temporary beard-these can complete the transformation beautifully and add fun details.
When planning for a special occasion, remember the importance of comfort too. Make sure that any products used are non-toxic and suitable for sensitive skin, especially if the child will wear it for an extended period. An enjoyable approach can even involve the child in the process; let them help with the selection of colors or the design of their aged look. This not only fosters creativity but also ensures they feel at ease with their eventual transformation.
Lastly, don’t forget to take plenty of pictures! The joy of seeing how someone transforms for an event can be captured and cherished. This entire experience-embarking on a creative journey to create an aging makeup look-can become a memorable bonding moment, filled with giggles and artistic flair. Enjoy the artistry and the process!
Faq
Q: How can I make a kid’s face look older with makeup?
A: To make a kid’s face look older, use techniques like adding shadows and highlights to create depth. Focus on fine lines by drawing subtle wrinkles using a fine eyeliner or shadow, and use a matte foundation to mimic older skin texture. Always ensure the makeup is easily removable and safe for kids.
Q: What colors work best for aging makeup on children?
A: Use muted, earthy tones such as browns, greys, and muted purples to create an aged look. Lighter shades with a hint of beige can simulate older skin tones, while deeper colors can add dimension to the cheeks and eyelids. Avoid bright or flashy colors that can appear too youthful.
Q: Are there specific tools needed for aging makeup effects on kids?
A: Yes, use tools like a stippling sponge for texture, a fine tip brush for detailing wrinkles, and a soft powder brush for blending. A light highlighter can help create the illusion of aging features. Soft brushes assist in achieving a smooth finish without harsh lines.
Q: How do I apply makeup to create a wrinkled effect?
A: To create a wrinkled effect, use a fine brush to draw thin lines in places where wrinkles naturally occur, like around the eyes and mouth. Blend these lines gently with your fingertip to soften the appearance. Incorporating a light foundation on top can add realism.
Q: What steps should I take to remove aging makeup from a child?
A: To safely remove aging makeup, use a gentle makeup remover or baby oil on a cotton pad. Apply it to the skin, allowing it to sit for a few moments to dissolve the makeup, then wipe gently. Always follow with a mild soap to cleanse the skin thoroughly.
Q: Is it safe to use regular makeup on children to create an aged look?
A: While some regular makeup products can be safe, it’s best to use kid-friendly or hypoallergenic products to prevent skin irritation. Always do a patch test beforehand and ensure that all products are easily washable and non-toxic.
Q: When is it appropriate to use aging makeup techniques on children?
A: Aging makeup techniques are suitable for costume events, theatrical performances, or Halloween. Always ensure that the context is appropriate, fun, and that the child is comfortable with the transformation. Choose light applications to keep it playful.
Q: How can I ensure the aging makeup looks realistic?
A: For realistic aging makeup, focus on blending and using light layers. Use translucent powder to set the makeup, preventing it from looking too heavy. Observe pictures of older skin for reference and aim to imitate natural lines and imperfections without overdo it.
In Summary
Now that you’ve learned how to master aging techniques for makeup, it’s time to put that knowledge into action! Use these strategies to create stunning looks while keeping in mind the importance of subtlety and safety. Remember, practice makes perfect, so don’t hesitate to revisit our guide as you refine your skills.
For more tips on enhancing your makeup prowess, check out our articles on “10 Essential Makeup Brushes Every Beginner Needs” and “How to Properly Remove Makeup: Step-by-Step.” These resources will help elevate your beauty game even further!
If you found this guide helpful, consider signing up for our newsletter for regular tips, tricks, and exclusive content directly to your inbox. Your journey into the world of makeup doesn’t stop here. Explore, experiment, and most importantly, have fun! We’d love to hear about your experiences, so drop a comment or share your successes with us. Happy makeup artistry!