Transforming your child into a spooky zombie this Halloween can be a thrilling experience, but safety is always a priority. In this guide, we’ll explore kid-friendly zombie makeup techniques that are both scary and safe, ensuring your little one feels comfortable while looking convincingly creepy! Whether it’s for trick-or-treating or a Halloween party, you’ll discover easy-to-follow steps and product recommendations that won’t irritate sensitive skin. Dive in as we unravel tips and tricks for creating a chilling look that will impress friends and neighbors alike, all while keeping your child’s comfort at heart. Get ready for a fun, creative session that both you and your child will enjoy!
Understanding the Essentials of Kid Zombie Makeup
Creating the perfect kid zombie look hinges on understanding the essentials of makeup that is both imaginative and safe. Kids love to transform into spooky characters, especially during Halloween or themed parties, but it’s crucial to ensure that the makeup used is suitable for their delicate skin. The foundation of a great zombie makeup lies not just in achieving the right look but also in prioritizing safety and comfort.
When planning your kid’s zombie transformation, consider the face paint materials. Go for products that are specifically labeled as non-toxic and hypoallergenic, ideally made from water-based formulas. This not only minimizes skin irritation but also allows for easier removal after the festivities. A quick patch test on a small area of skin can help identify any potential adverse reactions beforehand, giving both you and your little one peace of mind.
Another key aspect is the application technique. Using soft makeup sponges ensures an even layer that blends well, creating that desired ghostly pallor. For added effects, utilize a stippling sponge to create texture, making the makeup look more realistic. This method encourages creativity and encourages children to express themselves through their zombie personas while ensuring that the process remains fun and engaging.
In summary, the essentials of kid zombie makeup revolve around choosing safe, non-toxic products, using appropriate application techniques, and keeping the experience enjoyable. Emphasizing these aspects allows you to foster creativity while ensuring the safety and comfort of your child during their transformation into the perfect little zombie.
Choosing Safe Products for Zombie Face Paint
When selecting face paint for your little one’s zombie transformation, safety should always come first. The delicate nature of children’s skin means you need products that not only create the desired spooky look but also minimize the risk of irritation. Fortunately, there are many fantastic options available that fit these criteria. Look for face paints that are specifically labeled as non-toxic and hypoallergenic, ideally those formulated with water-based ingredients. This type of face paint is gentle, easily washable, and drastically reduces the chances of causing allergic reactions.
Before diving into application, perform a simple patch test by applying a small amount of the face paint on a discreet area, such as the inside of the wrist. Wait 24 hours to see if any irritation occurs. This small step can provide great peace of mind. Plus, many trusted brands often detail their ingredients and safety measures on their labels or websites, allowing you to make an informed choice.
Key Features to Look For
When evaluating face paints, consider the following features:
- Water-Based Formulas: These are easier to remove compared to oil-based paints and tend to be less prone to clogging pores.
- Hypoallergenic Options: Perfect for sensitive skin, these products are less likely to cause reactions.
- Easy Removal: Look for paints that can be easily washed off with soap and water to make post-party cleanup a breeze.
- Vibrant Colors: Ensure the face paint offers a vibrant color payoff for that realistic zombie effect.
Ultimately, your goal is to create a look that’s both fun and safe. High-quality brands, such as Snazaroo or Face Paints by Mehron, are renowned for their skin-friendly formulas. By taking the time to choose the right products, you not only ensure a successful Halloween transformation but also make the experience enjoyable and worry-free for both you and your child.
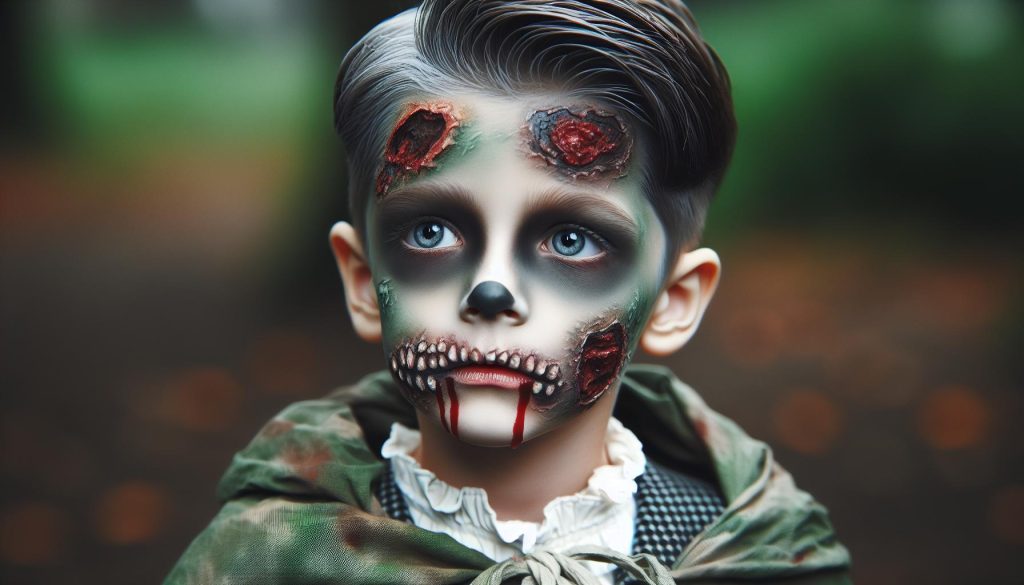
Step-by-Step Guide to Creating Kid-Friendly Zombie Looks

Creating a fun and spooky kid-friendly zombie look can be a thrilling experience for both you and your child. The key is to combine creativity with safety, ensuring that the process is enjoyable from start to finish. Let’s dive into a straightforward, step-by-step approach that makes the transformation seamless and exciting.
Begin by gathering all your materials. You’ll need non-toxic, water-based face paints, makeup sponges, brushes, a setting spray or powder, and some fun accessories like fake scars or temporary tattoos. Preparing your workspace is essential: lay down newspaper or a plastic sheet to catch any spills and have some makeup wipes handy for quick clean-ups.
Next, start with a clean and moisturized face. Apply a thin layer of pale foundation or white face paint to create that undead look. You can use a damp makeup sponge to ensure an even distribution. Focus on the cheeks, forehead, and chin, blending well for a smooth base. This light base allows you to build up layers of color and texture that replicate that classic zombie appearance.
With the base set, it’s time to add some color. Use shades of grey, green, or even light purple to create shadows on the hollows of the cheeks and around the eyes. Gently dab these colors with your sponge or a brush, concentrating on areas like beneath the cheekbones to give a sunken effect. For the eyes, consider using dark face paint to create a halo around the eyelids and add depth. You can also accent with a little red or dark brown to give the appearance of additional wear or injury.
To finish the look, consider detailing. Add fake scars or bruises with special effects makeup products, blending them into the skin with your fingers or a sponge. An easy way to elevate the costume is to pair the makeup with tattered clothing and some fun accessories, like zombie hands or props reminiscent of a classic horror movie.
Finally, once the party or event is done, make sure to remove the makeup safely. Use a gentle facial cleanser or makeup wipes to clean the face thoroughly. A warm washcloth will help loosen any stubborn areas, but always ensure the skin is completely cleaned to avoid irritation.
This step-by-step guide not only helps you create an impressive zombie look but also celebrates creativity in a safe environment. Now, go ahead and embrace the spooky season with your little ghouls and goblins!
Comfortable and Breathable Makeup Techniques

When transforming kids into delightful zombies, comfort is as important as the spooky look you aim to achieve. Using breathable makeup techniques not only ensures a fantastic appearance but also keeps your child comfortable throughout the festivities. This can make a significant difference, especially during events that might last several hours.
Begin by selecting non-toxic, water-based face paints-a safe choice that’s easy to remove and kind to young skin. These types of products allow the skin to breathe, preventing irritation or discomfort. It’s wise to conduct a quick patch test before applying any makeup extensively. Simply dab a small amount on the inner arm and wait for 30 minutes to check for any adverse reactions. If there’s no irritation, you’re good to go!
While applying zombie makeup, be sure to use light layers. Start with a thin base coat to create that ghostly look, and build up intensity gradually. Instead of piling on thick layers, which can feel heavy and claustrophobic, dab on colors with a damp sponge or your fingers. This method not only provides good coverage but also allows the skin to absorb some moisture, making it feel fresher. For the eyes, you can use lighter shades for a more ethereal look, applying dark pigments sparingly to prevent any potential sensitivity.
Finally, consider the environment where your little ones will be flaunting their zombie looks. If it’s a warm evening or they’ll be running around, you may want to use a light setting spray to help keep the makeup in place while allowing the skin to breathe. Avoid heavy powders that can create a cakey finish and clump up. Instead, opt for translucent powders that provide a natural finish without suffocating the skin.
Emphasizing comfort while achieving a spooky look is the key to a successful zombie transformation! With a focus on breathable products and techniques, you can ensure a fun, anxiety-free experience for your child.
Creative Ideas for Zombie Costumes and Accessories

To elevate your child’s zombie transformation, think beyond makeup and incorporate creative costumes and accessories that enhance the overall look. A well-rounded zombie costume will not only impress onlookers but also spark your child’s imagination, allowing them to fully embrace the spooky character they’re portraying.
Start with clothing: old, tattered clothes can make a perfect base for a zombie look. Consider using an oversized white shirt or a faded pair of jeans. Rip the fabric slightly and add some dirt or artificial blood (made from corn syrup and food coloring) to give it a gruesome touch. Layering works wonders too-adding a jacket or vest can create depth in the costume. You can even throw in a pair of mismatched socks or worn-out shoes for an extra bit of flair.
Next, don’t overlook the power of accessories. A faux chainsaw or a toy weapon can turn your child into a more menacing figure while remaining safe and child-friendly. Other great additions are a tattered hat or wig, which can add texture and help your child stand out. Consider face masks with spooky designs to complement the makeup, especially if you’re in settings where makeup might smudge.
For a fun DIY project, create a headband or bracelet made from odds and ends: think rubber bugs, fake eyeballs, or even pieces of plastic “rotting” flesh. This allows your child to express their creativity while enhancing the horror theme. If your child enjoys crafting, involve them in the process of making foam or cardboard tombstones for an eerie ambiance during trick-or-treating or at a Halloween gathering.
With these costume ideas and accessories, you can effortlessly elevate the zombie look while ensuring your child remains comfortable and excited about their spooky appearance. Encourage them to think of unique elements that resonate with their personality, combining horror with creativity for a memorable Halloween experience!
Tips for Removing Makeup Safely After Use

After your little zombie’s night of fun, safely removing the makeup can be just as important as applying it. The right approach not only ensures their skin stays healthy but also makes the process enjoyable. Remember, kids can be fidgety, so a playful attitude during cleanup can really help!
Start by gathering your tools. You’ll need a gentle makeup remover or a mild cleanser, some soft cloths or cotton pads, and perhaps a little lukewarm water. An oil-based makeup remover is particularly effective for erasing face paint, as it breaks down the pigments without irritating delicate skin. If you’re opting for a DIY solution, consider coconut oil or olive oil as a natural remover.
To begin, apply a small amount of the makeup remover to a damp cloth or cotton pad. Gently wipe the zombie makeup from their face, focusing on one area at a time, particularly around the eyes where makeup can be stubborn. For face paint, allow the product to sit for a few seconds to loosen the material before wiping away. This ensures a smoother removal process and minimizes the need for scrubbing, which can irritate the skin.
If any traces remain, a second application might be necessary. After removing all the makeup, wash their face with a mild soap and water to remove any residue from the remover itself. Finish with a soft towel and consider applying a fragrance-free moisturizer to combat any dryness from the makeup or remover. This will leave their skin clean, nourished, and ready for the next adventure, be it in ghostly attire or something entirely different!
In summary, the key is to be gentle and patient, turning what could be a tedious task into a relaxing routine. With the right products and techniques, you can ensure that your child’s skin remains as flawless as their zombie look was frightening!
Enhancing Your Zombie Look with Special Effects
Creating a standout zombie look for kids doesn’t just stop at the basics; enhancing the makeup with special effects can truly bring the undead to life-figuratively, of course! Incorporating various textures and details can elevate their costume from ordinary to terrifyingly fabulous.
Start with fake wounds or scars to give that authentic zombie appearance. You can easily create these using a combination of tissue paper and liquid latex. To do this, tear small pieces of tissue, apply a layer of latex to the desired area, and place the tissue on top. After another layer of latex over the tissue, let it dry. Once dry, you can paint over it with face paint to match your child’s skin tone, then use darker shades around the edges to simulate depth. This simple technique adds an impressive three-dimensional effect to the makeup.
Another fantastic enhancement is artificial blood, which can be drizzled around the mouth, on the hands, or anywhere to amplify that post-apocalyptic vibe. You can easily make your own using corn syrup mixed with red food coloring and a touch of cocoa powder for that realistic dark blood effect. This mix is not only safe for kids but also gives a much more authentic look than store-bought options. Just be mindful of using it sparingly to prevent it from becoming too messy, which can happen quickly with kids who can’t stay still!
Don’t forget to consider contact lenses for those that are a bit older and can handle them-they can create an eerily vacant or monstrous gaze. Opt for non-prescription ones that allow for dramatic effects like white, yellow, or red eyes. Pair these with some eerie hair styling, such as a messy, disheveled look using hair gel or spray, or even adding a little colored hair chalk to match the undead theme.
For an all-round enhanced experience, consider adding thematic props like a toy brain, severed limbs, or eerie accessories to tie in with their zombie look. These elements frame the face and overall appearance, making their transformation complete.
By focusing on these special effects, you’re not just allowing your child to dress up; you’re giving them the chance to fully immerse themselves in their zombie character. It’s about maximizing the fun and ensuring that the experience is as memorable as possible!
Planning a Zombie-Themed Party: Ideas and Tips
Throwing a zombie-themed party can be a frightfully fun experience, and it’s the perfect way to let creativity shine and bring a little spooky magic to life! Start by creating an eerie atmosphere that sets the tone right from the moment guests arrive. Decorations like fake cobwebs, plastic skeletons, and dim lighting can transform any space into a chilling undead zone. You might also consider using themed tableware and even costumes that match the zombie vibe, which can easily enhance the overall aesthetic.
For activities, think of both fun and interactive options. Set up a zombie makeover station where kids can practice their own kid-friendly zombie makeup using safe products. Have a few adults on hand to assist with applying face paint and special effects. You could also organize a zombie dance-off, encouraging kids to unleash their best zombie moves, which is not only entertaining but also gets them moving!
Set the menu with delightfully gross-themed treats. For example, serve “bloody” punch (red fruit punch) and moldy monster cupcakes (green frosting with edible decorations) to keep the theme consistent while ensuring the snacks look as fun as they are delicious. A “brain” Jell-O mold can easily garner squeals of surprise and laughter.
Finally, don’t forget about party favors that will send everyone home with a spooky keepsake. Consider small bags filled with Halloween candy, DIY zombie masks, or even mini bottles of homemade faux blood (corn syrup with food coloring) for a little added fun. A well-planned party can create unforgettable memories, capturing the thrill of the undead while ensuring that everyone has a blast!
Photography Tips to Capture Your Zombie Kid
Capturing the eerie charm of your little zombie on camera can be just as thrilling as the makeup application itself. From the first flash of the camera to the delightful edits, every snap serves to freeze those unforgettable moments when your child transforms into a creative and spooky masterpiece. Begin by choosing a setting that enhances the overall zombie theme-think dimly lit rooms or outdoor spaces at dusk. The shadows and low lighting will help set an authentic atmosphere that complements the zombie look and makes the makeup truly pop.
When it comes to photography, lighting is crucial, especially with face paint that may have subtle highlights and shadows. Natural light works wonders, so opt for outdoor shoots during the golden hour (just after sunrise or before sunset), as this soft light enhances colors and textures. If shooting indoors, consider using soft lamps or diffused lighting to reduce harsh shadows. As you position your child, angle the camera slightly upward to capture their face and makeup details, aiming for a more dramatic and imposing effect.
Don’t forget to focus on the little details that bring the zombie look to life! Capture close-up shots of the makeup up close to highlight the intricate designs, such as fake wounds or gory splashes of paint. A few creative poses can also add flair-encourage your little zombie to strike a spooky pose or mimic classic horror film expressions, adding a touch of theatricality. Lastly, consider using props like fake tombstones, creepy dolls, or spider webs to amplify the ambiance and create a fun storytelling element in your photographs.
After the shoot, enhancing the photos can elevate your captures to a whole new level. Use simple editing tools to adjust brightness and contrast, making the makeup stand out even more. You might also consider adding filters that give a vintage horror look or a bit of color splash for dramatic effect. In the end, the goal is to celebrate the spooky creativity and laughter of your child, creating lasting memories you both will treasure.
Incorporating Fun Props for Added Spookiness
Using props can elevate your child’s zombie look from spooky to spectacular, adding layers of creativity and making the transformation even more fun. Whether you’re planning for Halloween, a themed party, or just a playful day at home, incorporating a few strategic props can enhance the overall effect and your child’s enjoyment of the experience.
Start by considering the atmosphere you want to create. Common props like fake gravestones, skeleton figurines, and spooky lighting can instantly set the scene. For example, positioning a gravestone in the background can give photographs an eerie touch, while skeleton hand props can serve as playful-yet spooky-elements that kids can hold or interact with. Bright plastic spiders and cobwebs can transform even the most mundane spaces into creepy, Halloween-ready settings.
When choosing props, think about durability and safety, especially with younger kids. Opt for lightweight materials that won’t cause injury if dropped or bumped during a lively play session. Simple items like fake blood capsules or black gauze fabric can create the illusion of gory details without the mess of real materials. Adding fun accessories, like plastic chains or monster feet slippers, can also deepen the theme and encourage imaginative play.
Don’t forget about sound and movement! Props like motion-activated sound boxes that play eerie noises can add an extra dimension to your zombie theme. Some families even create a small scavenger hunt with props to engage kids further; imagine them searching for the “secret stash” of zombie accessories hidden around the yard! These thoughtful additions not only enhance the look but also turn the styling into an engaging activity, making the whole process memorable and full of giggles. The right props can truly bring your child’s zombie character to life, making the Halloween season or any occasion a fantastic blend of creativity and fun.
Alternative Non-Makeup Zombie Looks for Kids
Creating a spooky zombie look for kids doesn’t necessarily require face paint or makeup. With a little creativity and thought, you can achieve a frightfully fun zombie appearance using clothing, accessories, and props instead. This approach is ideal for children who may have sensitivity to makeup or simply prefer to avoid it altogether, allowing for a safe and enjoyable transformation.
One effective way to create a non-makeup zombie look is to focus on the clothing. Start with old or oversized clothes that can be easily torn or distressed. Consider using shredded fabric to mimic the tattered appearance of a zombie’s outfit. Paint or dab some age-appropriate fabric-safe paints in dark colors like gray, black, and green to give the clothes a more sinister vibe. You could even add dirt or mud to create that “freshly risen from the grave” look. Layering different materials, such as a shredded t-shirt over a long-sleeve top, can add depth and further enhance the effect.
Additionally, accessories play a crucial role in completing the zombie transformation. Encourage kids to wear props such as fake arms or legs or use plastic zombie hands to enhance their look. Accessories like a tattered cloak or a costume wig with messy hair can create fantastic touches. Using creative elements such as fake blood (easily made at home with corn syrup and red food coloring) applied to clothing or props can add an eye-catching effect without the need for makeup.
Sound and movement can elevate the experience even more-consider adding a creepy soundtrack or fun zombie-themed accessories like toy chains to give character to your zombie’s walk. Engaging with props that are safe and easy to use will ensure kids have a blast while embodying their eerie characters. This approach not only makes the process enjoyable but also encourages imaginative play, allowing the kids to fully embrace the spooky spirit of the occasion.
By focusing on clothing, accessories, and props, you can achieve an exciting and safe zombie look for kids that is both creative and easy to put together, ensuring that they have a memorable experience.
FAQ
Q: What are the best products for kid-friendly zombie makeup?
A: For kid-friendly zombie makeup, look for non-toxic face paints specifically labeled safe for children. Water-based face paints are ideal for easy application and removal. Brands like Snazaroo and Face Paints offer quality options that ensure safety and vivid colors. Check our section on “Choosing Safe Products for Zombie Face Paint” for detailed recommendations.
Q: How can I make zombie makeup last longer on kids?
A: To make zombie makeup last longer, start with a clean, moisturized face and use a primer designed for makeup longevity. Opt for setting powders or sprays after application, which can help maintain the look throughout the day. Refer to our “Comfortable and Breathable Makeup Techniques” for further tips.
Q: What if my child has sensitive skin?
A: If your child has sensitive skin, conduct a patch test with any makeup product 24 hours before application. Use hypoallergenic and fragrance-free face paints to minimize irritation. See our section on “Choosing Safe Products for Zombie Face Paint” for more insights on skin-friendly options.
Q: Can I use regular makeup for kid zombie looks?
A: While you can use regular makeup, it’s not recommended due to potential skin irritation or toxicity. Opt for face paints specifically designed for children to ensure safety. Our article on “Understanding the Essentials of Kid Zombie Makeup” discusses this in depth.
Q: How should I remove zombie makeup after use?
A: To safely remove zombie makeup, use a gentle makeup remover or cleansing wipes designed for kids. Follow up with a warm washcloth and a mild cleanser to ensure all residue is gone. Check “Tips for Removing Makeup Safely After Use” for more details.
Q: What accessories can enhance a kid’s zombie makeup look?
A: Accessories like fake scars, torn clothing, or zombie-themed props can greatly enhance a child’s zombie makeup. Consider adding a spooky mask or fake blood for dramatic effect, as described in our section on “Incorporating Fun Props for Added Spookiness.”
Q: How do I ensure my kid is comfortable in their zombie makeup?
A: To keep your child comfortable, choose breathable face paints and avoid heavy layers. Make sure to apply makeup lightly and use gentle techniques, as outlined in “Comfortable and Breathable Makeup Techniques.” Always ensure they’re not feeling any discomfort during application.
Q: Are there alternatives to using makeup for a zombie look?
A: Yes, alternatives to makeup include using zombie costumes with printed designs or masks. Special effects like temporary tattoos also offer a safe and easy way to achieve a zombie look without face paint. For more ideas, check our section on “Alternative Non-Makeup Zombie Looks for Kids.”
Closing Remarks
Now that you know how to do kid zombie makeup safely and effectively, it’s time to unleash your creativity! Remember, the key is to keep it fun and spooky while ensuring your little ghouls feel comfortable. Don’t hesitate to experiment with different looks, and check out our other tutorials on Halloween makeup and costume ideas for even more inspiration.
If you found this tutorial helpful, consider signing up for our newsletter for exclusive content and tips straight to your inbox. Have questions or want to share your zombie makeup results? Drop a comment below; we’d love to hear from you! For your next steps, explore our guides on kid-friendly face paints and skincare tips to prepare for your transformations. Happy haunting, and enjoy the spooky season!