Did you know that many commercial makeup products for kids contain ingredients that may not be safe for their delicate skin? Making your own kids’ makeup at home can be a fun and creative way to engage your little ones while ensuring that the ingredients you use are gentle and safe. In this guide, we will explore simple recipes for natural, DIY makeup using kitchen staples that you likely already have on hand. Whether you’re looking to create colorful lip gloss or playful face paints, making kids’ makeup at home not only promotes creativity but also gives you peace of mind about what your children are using. Join us as we dive into easy-to-follow steps, making it both safe and enjoyable to let kids express themselves through makeup!
Understanding the Benefits of Kid-Friendly Makeup
Engaging with kid-friendly makeup can be a delightful experience for both children and parents, providing a unique opportunity for creativity and self-expression. These products are specifically designed with gentle, non-toxic ingredients that ensure safety while allowing kids to explore their imaginative sides. Instead of worrying about harmful chemicals often found in conventional cosmetics, parents can feel confident that they are using products made from natural materials that are safe for young skin.
One of the notable benefits of homemade, kid-friendly makeup is the control it gives you over the ingredients. By using common kitchen staples like coconut oil, beet juice, and cocoa powder, you can create vibrant and fun makeup options without the nasty additives. This not only promotes a healthier application but also introduces kids to the world of natural products, fostering an understanding of what goes onto their skin from an early age. Moreover, creating makeup together can be a fun bonding exercise, helping children learn about responsibility and science through hands-on experimentation.
The process of crafting makeup at home can also promote creative thinking. Children can personalize their shades and formulas, learning about color mixing and texture while engaging their sensory abilities. Whether they’re blending colors for their own homemade lip balm or experimenting with various ingredients to achieve the perfect face paint, the possibilities are endless. In this environment, makeup becomes not just about aesthetics but an enriching activity that encourages exploration, art, and self-confidence.
Choosing Safe Ingredients for Homemade Makeup
When it comes to homemade makeup for kids, the ingredients you choose make all the difference. Opting for natural, safe ingredients not only protects young, delicate skin but also fosters a fun and educational experience. Many traditional cosmetics contain harmful chemicals that can irritate skin or cause allergic reactions, making DIY solutions appealing for conscious parents. Understanding what to use is key to creating delightful and safe beauty products that your little ones can enjoy.
Begin with basic pantry staples that are not just safe but also versatile. For instance, coconut oil serves as an excellent base for balms and moisturizers due to its hydrating properties. Additionally, beet juice provides a vibrant natural tint perfect for lip products, while it’s also packed with nutrients. Other combinations might include cocoa powder for a natural bronzer and aloe vera gel for soothing properties, making it perfect for sensitive skin. These ingredients do double duty, allowing you to craft makeup while imparting a lesson about natural products and self-care.
When it comes to colors, look toward fruits and vegetables for inspiration. Turmeric can add a sunny yellow hue, whereas spirulina lends a fun green tone to face paints. By engaging kids in selecting colors, you promote creativity as they learn about mixing and matching colors. Just remember to avoid any allergens; always check ingredient lists if you’re unsure whether something is safe for your child? Consulting with them about what goes onto their skin helps instill a sense of responsibility regarding personal care.
Lastly, always emphasize the importance of performing a patch test before using the products extensively. Applying a small amount of the homemade makeup on the inside of the wrist can help identify any reactions. This isn’t just a precaution-it’s a valuable lesson in being mindful of their body. By choosing safe ingredients and involving your children in the process, you’re not only providing them with fun and creative tools but also fostering a healthy relationship with self-expression and personal care.
Essential Tools for DIY Kids Makeup
Creating delightful and safe homemade makeup for kids is a rewarding adventure, and having the right tools makes all the difference. To ensure a smooth DIY experience, gather a few essential items that will make the process enjoyable for both you and your little ones.
Start with basic kitchen supplies. A set of measuring spoons and cups is crucial for accuracy. You might also want a range of mixing bowls or containers to hold ingredients while you whip up your creations. Whisks or spoons are perfect for blending together different components like oils, coloring agents, and other ingredients. Consider using a small electric mixer if you want a smoother consistency for products like lip balm or face paint.
Tools to Enhance the Experience
Incorporating fun into the process is just as important as safety and quality. Gather a selection of applicators such as brushes or cotton swabs, which allow children to get creative with their makeup application. You can repurpose old cosmetic brushes or buy inexpensive ones specifically for this project. For face paints, sponges can help blend colors beautifully and smoothly.
Another fun tool is a small funnel. This makes transferring your homemade products into containers easy and mess-free. If you’re planning to create items like lip balm or gloss, look for small, clean jars or lip balm tubes to store the finished product. These not only keep your creations tidy but also give your kids the excitement of having their unique beauty items.
Finally, a labeling system can help you and your children keep track of different creations. Use stickers or washi tape to mark jars with the product name and date it was made. This not only teaches kids about organization but also adds to the overall experience of crafting their beauty products.
In summary, equipping yourself with the right tools not only simplifies the DIY process but also enriches the experience for everyone involved. With just a few simple items from your kitchen and craft supplies, you can embark on a wonderfully creative journey that prioritizes safety and fun for your kids, instilling a sense of pride in their unique creations.
Step-by-Step: Making Non-Toxic Lip Balm
Making your own non-toxic lip balm at home is not only a fun and creative activity, but it also allows you to control the ingredients, ensuring they’re safe and suitable for children. It’s a simple process that can be done in just a few steps, and it’s perfect for getting kids involved in a way that instills both creativity and a sense of accomplishment.
Start by gathering your ingredients and equipment. You will need:
- Beeswax pellets (2 tablespoons) – this helps harden the balm.
- Oil (2 tablespoons) – coconut oil is a great choice because it’s moisturizing and has a pleasant scent.
- Essential oils (optional) – for fragrance, such as lavender or peppermint.
- A small container for storing the balm, like a metal tin or lip balm tubes.
- A heat-safe bowl for melting ingredients.
- A spoon for mixing.
Begin the process by melting the beeswax and oil together. The best method is to create a double boiler setup: place the heat-safe bowl over a pot of gently simmering water. This indirect heat will melt the beeswax and coconut oil slowly and safely without burning. Stir the mixture occasionally until fully melted.
Once melted, remove the bowl from the heat. If you’re using them, now is the time to add a few drops of essential oils for fragrance. Just a tiny amount can go a long way, so start small and adjust to your taste. Mix thoroughly to ensure the oils are evenly distributed throughout.
Now, carefully pour your mixture into the container(s) you’ve prepared. If you’re using tubes, a small funnel can make this step easier and less messy. Allow the lip balm to cool completely, which should take about 30 minutes. As it cools, it will harden into a smooth, easy-to-apply balm.
Involving your kids in the process can make this a memorable experience. Encourage them to choose the scents or add natural colorants, like a pinch of beet powder or cocoa powder, for fun. Discuss the benefits of each ingredient, highlighting the safe and healthy aspects of your DIY project.
By following this simple recipe, you’ll have a customized lip balm that’s not only effective but also free from harmful chemicals, making it a wonderful addition to any child’s makeup kit. Plus, the joy of making something themselves will surely enhance their creativity and confidence!
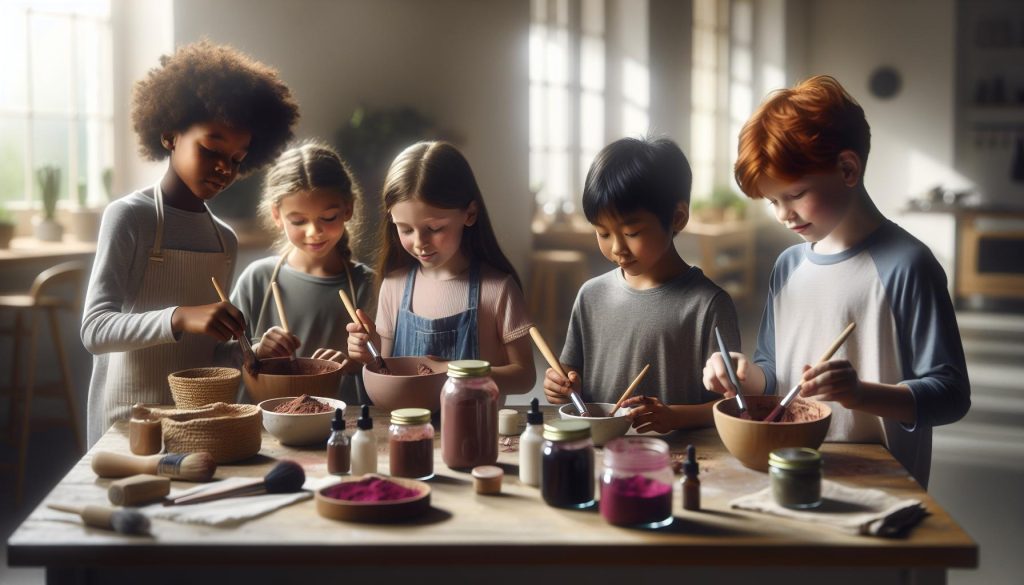
Crafting Natural Face Paint with Household Items
Creating face paint at home can be a delightful and creative way for kids to express themselves while ensuring that the ingredients are safe and non-toxic. Using items you probably already have in your kitchen, you can craft vibrant colors perfect for playdates, parties, or just a fun afternoon. Not only is this process engaging, but it also provides a fantastic opportunity to teach children about the ingredients they are using.
To get started, you’ll need a few simple ingredients: cornstarch, flour, water, and food coloring. Cornstarch is great for creating a smooth texture that adheres well to the skin, while flour helps with opacity. Here’s a quick guide to making your natural face paint:
- Base Mixture: In a bowl, combine 2 tablespoons of cornstarch with 2 tablespoons of flour. Gradually mix in 1/2 cup of water until you achieve a smooth paste.
- Add Color: Divide the base mixture into smaller bowls and add food coloring. You can experiment with different shades by mixing colors. For example, combine red and blue to make purple!
- Store Properly: Use small containers with lids to keep the face paint fresh. It can typically last for up to a week in the refrigerator.
One important point to emphasize is skin safety. Before applying any homemade face paint, it’s wise to conduct a patch test on a small area of skin, such as on the wrist, to rule out any allergic reactions. Encourage your kids to have fun exploring colors and designs, and inspire their creativity by letting them decorate their faces or each other.
Face painting can be more than a pastime; it offers a fantastic platform for storytelling and role-play. From superheroes to animals, the only limit is their imagination. This bonding activity can leave lasting memories and even teach kids the value of creativity and resourcefulness. By crafting your own face paint, you’ll give them not just a fun product for play but also a lesson in making safe choices!
Creating Colorful Eyeshadow from Kitchen Staples
Creating eyeshadow at home can be a fun and colorful activity that not only allows kids to express their creativity but also keeps them safe with non-toxic ingredients. Using common kitchen staples, you can craft vibrant shades of eyeshadow that are gentle on little eyes. It’s a fantastic opportunity for kids to engage in a craft while learning about colors and textures.
To make homemade eyeshadow, you’ll need a few basic ingredients. Start with cornstarch as a base, which helps create a smooth texture. For color, you can use spices and food coloring. Here’s a simple recipe to get started:
- Ingredients Needed:
- 2 tablespoons of cornstarch
- 1 tablespoon of cocoa powder or spice (like turmeric for yellow or beetroot powder for pink)
- 1 tablespoon of coconut oil (for a smooth application)
- Optional: A few drops of food coloring for more vibrant hues
Begin by mixing the cornstarch and cocoa powder or chosen spice in a small bowl. If you want a specific color, this is where you can add food coloring. For example, adding a pinch of turmeric will create a sunny yellow shade, while beetroot powder gives a pretty pink blush. Gradually mix in the coconut oil until you reach a smooth consistency. If you prefer a more paste-like texture, decrease the oil slightly.
Once the mixture is thoroughly blended, transfer it into a small container for storage. A small jar or an empty eyeshadow pot works well. To apply the eyeshadow, simply use a clean finger or a brush to dab a small amount onto the eyelids. Remember, a little goes a long way, especially with the pigments from spices!
Creating eyeshadow at home not only ensures the safety of the ingredients but also makes for a delightful craft project. Encourage kids to experiment with different combinations to make their own custom shades. This activity fosters creativity while giving them a playful way to experiment with colors. Just like with any homemade product, it’s wise to do a patch test on a small area of skin to ensure there are no allergic reactions. Enjoy this colorful journey into the world of DIY makeup!
How to Make Glitter with Safe Ingredients
Creating homemade glitter can add a sparkly touch to your kids’ makeup projects without the worries of harmful chemicals commonly found in store-bought options. Not only is this activity a fantastic way for children to express their creativity, but it also encourages them to engage with safe, household ingredients. Plus, it’s incredibly simple and fun!
To make your own glitter, you’ll need minimal ingredients and just a few steps. Start with coarse salt or sugar as your base since they reflect light beautifully and can be easily colored. Here’s how you can create your own sparkling blend:
- Ingredients Required:
- 1 cup of coarse salt or sugar
- Food coloring
- Baking sheet
- Oven (optional)
Begin by dividing the salt or sugar into small bowls, depending on how many colors you want to create. Add a few drops of food coloring to each bowl and mix thoroughly until the color is evenly distributed. The more color you add, the more intense the glitter will be, so feel free to experiment with different shades.
If you want to dry the mixture for use as a decorative glitter powder, spread it out evenly on a baking sheet and place it in a 350°F (175°C) oven for about 10 minutes. This step helps to set the color and remove any moisture, ensuring your glitter stays vibrant. Keep a close eye on it to prevent burning!
Once cooled, the colored salt or sugar can be transferred into small containers or jars for storage. This glitter can be used in various ways, like sprinkling it on face paint, or adding it to homemade lip gloss for a sparkling effect. Engage your kids in the process, allowing them to create their unique colors and blends.
One key point to keep in mind is safety. While this glitter is non-toxic, it’s not meant for consumption-so remind your little ones that it’s for external use only. This creative project not only provides a safe alternative to traditional glitter but also nurtures imaginative play, turning your home into a mini makeup studio. Enjoy the sparkly fun!
Tips for Storing and Preserving Homemade Makeup
Storing homemade makeup properly is essential to maintain its freshness, safety, and effectiveness, especially when it comes to products intended for kids. Unlike commercial makeup, DIY formulations often lack preservatives, which means you’ll need to take some extra steps to ensure they last. Here are some practical tips to help you store and preserve your homemade creations effectively.
To begin with, choose the right containers. Opt for glass jars or BPA-free plastic containers that can be tightly sealed. Make sure they are clean and dry before transferring any makeup into them. This minimizes the risk of introducing bacteria that can cause spoilage. If you’re making items like lip balm or face paint, small pots or squeeze tubes work well, allowing for easy application and minimal exposure to air.
Next, keep your homemade makeup in a cool, dry, and dark place. Exposure to light, heat, and humidity can decrease the shelf life of your products. A bathroom cabinet or a kitchen pantry are great spots for storage. For products with water content, consider refrigerating them, particularly if you live in a warm climate. Just be sure to label each container with the date it was made and its intended use-by date to keep track of freshness.
Understanding how long you can expect your products to last is also crucial. Generally, homemade makeup without preservatives will last for about 1 to 3 months, depending on the ingredients used. For lightweight, oil-based formulations like lip balms, the shelf life may extend up to 6 months. However, always inspect your products for changes in color, odor, or texture before use, as these can signal spoilage.
Lastly, involving kids in the storage process can make it a fun learning experience. Encourage them to help organize the containers and label them with fun designs or stickers. This not only makes the process enjoyable but also teaches them the importance of cleanliness and organization when it comes to their creations.
By following these tips, you can ensure that your homemade kids’ makeup remains safe and enjoyable to use, fostering creativity while prioritizing health and safety.
Fun Ways to Involve Kids in the Makeup Process
Involving kids in the makeup process is not only a fun bonding activity but also a fantastic way to spark their creativity and imagination. It transforms a simple task into an exciting adventure, allowing them to express themselves while learning about safe ingredients and the art of makeup. Here are several engaging ways to include children in the makeup-making journey.
Start by turning your kitchen into a creative lab. Set aside a dedicated time to mix and explore various ingredients, allowing kids to measure and combine them. They can take charge by selecting colors for homemade lip balms or face paints, which fosters a sense of ownership. For an extra touch of fun, encourage them to name their creations-imagine a bright pink lip balm called “Bubblegum Bliss” or a sparkly face paint labeled “Unicorn Dreams.” This not only enhances their creative thinking but also gives them a sense of pride in their work.
Another creative idea is to host a DIY makeup party with friends. This can be a great way for kids to socialize while learning together. Provide all the materials for making safe and fun makeup items, like natural lip balms and face paints. Set up different stations for each type of makeup and let the kids rotate through them. They will enjoy experimenting with colors, trying out application techniques, and even giving each other makeovers. You could even organize a mini fashion show at the end where they showcase their “looks,” encouraging their imagination while building confidence.
Incorporating storytelling can also make the process more engaging. While creating makeup, ask kids to imagine characters or themes-like pirates or fairies-that inspire their creations. For instance, if they’re making colorful eyeshadows, encourage them to think of how those colors represent magical landscapes, such as ocean blues or sunset oranges. This narrative element not only makes the activity enjoyable but helps them to think broadly about color application and creativity.
Finally, make it a learning opportunity by discussing the importance of safe ingredients. As kids participate, explain why certain ingredients are used and the benefits they bring. When choosing oils for lip balm, talk about why coconut oil is moisturizing and safe for their skin. This knowledge builds their understanding of skincare and encourages them to make informed choices as they grow.
Engaging kids in the makeup-making process emphasizes creativity, learning, and fun. By fostering a collaborative and imaginative environment, you create unforgettable moments filled with laughter and valuable lessons. Not only do they leave with delightful products, but they also develop a deeper appreciation for the art of cosmetics and safe beauty practices.
Safety Precautions When Using DIY Makeup
Ensuring the safety of homemade makeup for kids is paramount, as children’s skin can be particularly sensitive. It’s essential to pay attention to the ingredients used in your DIY recipes and the application methods. Start by conducting a patch test, especially with new ingredients or recipes. Simply apply a small amount of the mixture to a discreet area of skin, like the inner elbow, and wait for 24 hours to check for any adverse reactions. If any redness, itching, or irritation occurs, do not use that particular makeup.
When creating DIY products, prioritize natural and edible ingredients. For example, use coconut oil, shea butter, or beeswax as bases for lip balms and face creams, as these are less likely to trigger allergies or irritations. Avoid essential oils that might be too harsh for young skin, such as peppermint or eucalyptus, and instead opt for milder scents like lavender, if using any at all. Keep in mind that even natural ingredients can cause reactions in some individuals, so opting for the simplest formulations can be a safer route.
Another important aspect is cleanliness during the creation and application processes. Always use clean tools and containers when making and storing makeup. This prevents contamination and ensures that products remain safe to use over time. Store all homemade makeup products in labeled containers away from direct sunlight and extreme temperatures to maintain their integrity.
Lastly, during application, supervise children closely. Teach them about proper hygiene by reminding them to wash their hands before handling any makeup. It’s also wise to explain that they should avoid applying products near their eyes unless the product is specifically designed for that area. By following these safety precautions and fostering an understanding of safe practices, you can help kids enjoy the creative joy of makeup while keeping their health and safety at the forefront.
Creative Ideas for Makeup Playdates
There’s something enchanting about makeup that draws children in, transforming an ordinary day into a vibrant playdate filled with creativity and self-expression. By hosting makeup-themed playdates, you can create a fun and interactive environment where kids can explore their artistic sides while learning valuable skills. Here’s how to make these moments safe, engaging, and memorable.
Start by setting up a creative station filled with all the homemade makeup they can handle. Incorporate simple supplies like DIY lip balms, face paints made from natural ingredients like yogurt and food coloring, and eyeshadows crafted from kitchen staples such as cocoa powder or cornstarch. This not only keeps their skin safe but also fosters a spirit of exploration about what they are using on their bodies. Equip each child with their personalized makeup kit-a small, labeled container filled with their selections from your DIY options. This enables them to take ownership of their creations and be proud of what they are using.
Incorporate fun, themed activities that can elevate the playdate experience. For example, set up a “makeover booth” where kids can practice applying makeup on each other, encouraging teamwork and imagination. They’re not just playing with colors; they’re playing with confidence! If they’re interested, host mini-tutorials to demonstrate simple looks, such as butterfly face paint or sparkly lips, where they can learn and then replicate the ideas on themselves or their friends.
Don’t forget to involve a creative element like a photo booth where they can capture their beautiful creations. Use props, costumes, and a colorful backdrop to make the experience even more exciting. Download fun filters or effects afterward to enhance the digital memories! This way, they not only engage in the art of makeup but also get to celebrate their creativity together, fostering friendships and delightful memories.
Finally, wrap up the playdate by allowing kids to share their favorite parts of the day. Encourage them to reflect on what they loved about the process-perhaps it was mixing colors or seeing how their friends transformed each other’s looks. This dialogue builds community and empowers each child as they explore their creative juices. Moreover, if they leave with the knowledge of safe application and solid hygiene practices, you can ensure the fun continues long after they leave your makeup playdate!
Inspiring Kids’ Creativity: Makeup Applications
There’s a unique joy that comes from allowing kids to express themselves through makeup, especially when it’s crafted from safe, homemade ingredients. By engaging children in creating their own beauty products, you empower their creativity and encourage exploration in a way that feels fun and approachable. Imagine your little ones delighting in mixing natural colors to create their own unique face paint or watching their expressions of wonder as they apply a lip balm infused with their chosen flavors.
To inspire creativity, consider setting up a mini makeup studio at home. Provide a range of safe, DIY ingredients like shea butter for lip balms, beet juice for vibrant blush, and cocoa powder for eyeshadow. Allow them to choose their ingredients and colors, fostering a sense of ownership in their creations. As they blend, mix, and experiment, they not only develop artistic skills but also learn about different textures and colors in a hands-on way. Encourage them to come up with their own “signature looks,” which can lead to hours of imaginative play.
Incorporating makeup applications into playdates can further enhance their experience. Set up stations that focus on different skills: one for creating natural face paint, another for mixing lip balm, and a fun station where they can practice their application techniques on themselves and each other. You might even introduce themed applications such as “nature spirits” or “whimsical creatures” that encourage storytelling and situation-based imagination.
Don’t forget to celebrate their creativity! Host a mini fashion show where the kids can show off their creations. Use a smartphone or tablet to capture their beautifully adorned faces, and consider printing out fun memory cards featuring their artwork. This not only validates their efforts but also instills a sense of achievement. Empowering kids to explore makeup in a safe and guided environment helps cultivate their imagination, confidence, and skills-an experience that’s as enriching as it is enjoyable.
Frequently asked questions
Q: What are safe ingredients for homemade kids makeup?
A: Safe ingredients for homemade kids’ makeup include natural alternatives like coconut oil, shea butter, beetroot powder for color, and cocoa powder. These options are gentle on the skin and free from harmful chemicals commonly found in commercial products. Always opt for organic and non-toxic variants when available.
Q: How can I make kid-friendly blush at home?
A: To make kid-friendly blush, mix a small amount of arrowroot powder with natural colorants like beet juice or crushed berries. Adjust the amount of colorant until you achieve the desired shade. Store the blush in a small container for easy application.
Q: Can I use food coloring in homemade kids makeup?
A: Yes, food coloring can be used in homemade kids’ makeup, but always opt for natural food coloring to avoid harmful dyes. Mix it with a base like coconut oil or shea butter for safe application. Conduct a patch test on a small area of skin first to ensure there are no allergic reactions.
Q: What tools do I need to create DIY kids’ makeup?
A: Essential tools for creating DIY kids’ makeup include small mixing bowls, a spoon for stirring, measuring spoons, and containers for storing finished products. Optional tools like cosmetic brushes can help in application, making it more fun for kids.
Q: How can I safely store homemade kids makeup?
A: Store homemade kids’ makeup in a cool, dry place and ensure it’s in airtight containers to prevent contamination. For products like lip balms, using glass or AMP containers is ideal. Use within a few weeks to ensure freshness, and keep an eye out for any changes in color or smell.
Q: Is it safe for kids to play with makeup?
A: It’s generally safe for kids to play with makeup as long as it’s made with non-toxic, natural ingredients. DIY makeup encourages creativity and imaginative play while ensuring safety. Supervise children during playtime to avoid applying makeup near the eyes or mouth.
Q: How can I involve my child in the makeup-making process?
A: Involve your child by letting them choose colors and ingredients for their makeup. Teach them simple mixing techniques and allow them to decorate their containers. Making makeup together not only fosters creativity but also provides an opportunity for learning about safe products.
Q: What are the safety precautions for using DIY kids makeup?
A: Always perform a patch test on the skin to check for allergies before using homemade makeup. Ensure that all tools and containers are clean to avoid contamination. Supervise kids while applying makeup and discourage them from using it near their eyes or mouth.
Closing Remarks
Now that you’ve learned how to make kids’ makeup at home with safe ingredients, it’s time to get creative! Remember, the joy of DIY beauty is not just in the final product, but in the fun and bonding experiences along the way. Embrace the creativity and have your kids involved in the process-it’ll be a delightful way to spend time together while ensuring they use safe and natural products.
If you’re curious about more beauty DIYs or tips on skincare for children, be sure to check out our articles on natural skincare techniques and homemade beauty solutions. Also, don’t forget to subscribe to our newsletter for the latest updates and exclusive guides straight to your inbox!
We’d love to hear from you! Share your thoughts in the comments below, or let us know how your DIY makeup turned out. Every share and interaction helps foster a community of parents who care about safe and enjoyable beauty practices. Happy crafting!