Did you know that creating your own makeup can be a fun and educational activity for kids? Making makeup at home not only sparks creativity but also allows children to explore colors, textures, and scents safely. This guide will walk you through simple, fun projects to make easy and natural makeup that kids can enjoy using. Whether it’s lip balm, glittery eyeshadow, or face paint, these DIY recipes use safe ingredients found in your kitchen, making it a great bonding experience. Plus, it’s a wonderful way to introduce kids to the art of beauty and self-expression. So, let’s dive into these creative projects that are not only enjoyable but also practical and rewarding!
How to Ensure Safe Ingredients for Kids’ Makeup
When it comes to making makeup at home for kids, ensuring the safety of the ingredients is paramount. Children’s skin is delicate and can be more sensitive than that of adults, so using safe, non-toxic ingredients can help avoid potential irritations or allergic reactions. Start by choosing food-grade materials when possible, as these are generally safe for skin contact. This means opting for ingredients you may already have in your kitchen, like coconut oil, honey, or cornstarch.
It’s essential to avoid using any chemicals, artificial dyes, or fragrances that could harm your child. Instead, focus on natural alternatives. For example, beet juice can provide a lovely red tint for lip balm or cheek color, while cocoa powder can create a warm bronzer. Always perform a patch test on a small area of skin before fully applying any homemade product. This simple test helps ensure that your child doesn’t have any adverse reactions to the ingredients.
Maintaining a clean environment while crafting makeup is crucial. Use sterilized containers and tools, and always wash your hands before handling ingredients. Consider creating a small checklist of safe ingredients, and reference this list when gathering materials. This approach makes the process not only safe but also educational, teaching children about the importance of being mindful of what they put on their skin. Establish rules around hygiene and ingredient safety so that kids can enjoy the creative process without compromising their well-being.
Easy DIY Makeup Recipes for Kids
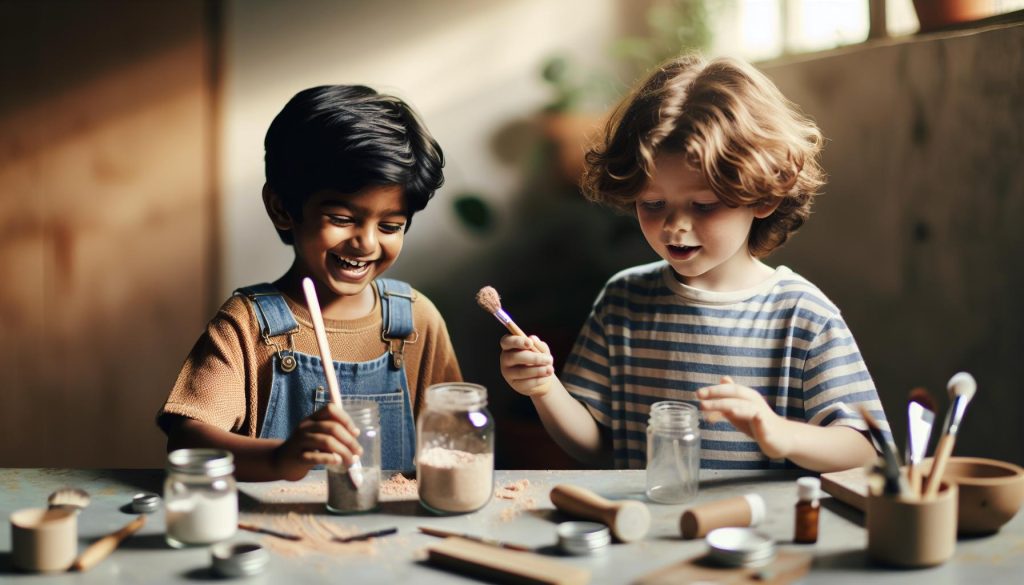
Making makeup at home can be a delightful experience for kids, allowing them to express their creativity in a fun, safe manner. By using simple, safe ingredients, you can help your child whip up their own beauty products right in your kitchen! Here are some easy recipes to get started on this colorful adventure.
One of the easiest recipes is for natural lip balm. Combine 1 tablespoon of coconut oil with 1 tablespoon of beeswax and melt them together in a microwave-safe bowl. Once melted, you can add a few drops of peppermint oil for a refreshing scent or even a small amount of beet juice to tint it naturally. Pour into small containers, and once it cools, they’ll have a fruity, colorful lip balm perfect for play!
For cheek tint, simply mix 1 tablespoon of aloe vera gel with a teaspoon of beet juice. This creates a vibrant, safe blush that is easy to apply. Your child can use their fingers or a sponge to dab it on their cheeks, giving them a rosy glow without any harsh chemicals.
Even eyeshadow can be a fun DIY project! Just take a small amount of cornstarch and mix in some cocoa powder for a brown shade, or use turmeric for a striking yellow hue. For a shimmer effect, consider adding a tiny pinch of cosmetic-grade glitter. This allows your little artist to experiment with different colors while staying safe.
Lastly, a homemade face paint can turn dress-up time into a colorful masterpiece. Mix 2 tablespoons of cornstarch, 1 tablespoon of water, and food coloring to create a vibrant paint that can be applied with a brush. It’s easily washable and safe for the skin, allowing for playful creativity during any pretend play session.
Creating makeup at home can spark creativity and provide a great bonding activity. Plus, it empowers kids to learn about colors and ingredients while keeping the crafting process safe and fun!
Fun and Creative Tools for Makeup Application
To make your child’s makeup experience both fun and imaginative, having the right tools is essential. Creative tools can elevate their playtime, allowing for greater exploration of colors and techniques. Start with using common household items that promote a sensory experience while ensuring safety.
Everyday Items as Makeup Tools
You’d be surprised by how many tools are readily available at home! For example, old makeup brushes can be a fantastic tool for application, but if you don’t have any handy, consider using cotton swabs or even a cleaned paintbrush. These alternatives can deliver precision in applying cheek tints or eyeshadow. Sponges are also incredibly versatile; they can be used to blend products smoothly on the skin. Just cut up a regular kitchen sponge into smaller squares, and they become the perfect tools for dotting on lip balm or face paint with ease.
DIY Applicators for Fun
Crafting your own applicators also adds a playful element! A simple way to do this is by taking popsicle sticks or small wooden dowels. Wrap one end with a piece of soft fabric to make a custom applicator for lip balms or cheek stains. Not only does this enhance the creative aspect, but it also helps your child feel involved in the whole process.
Enhancing Imagination with Accessories
Consider adding accessories that inspire imagination. Having fun headbands, temporary tattoos, or playful art stickers can turn any makeup session into a treasure hunt of creative possibilities. For instance, using glittery stickers as embellishments can allow kids to create their own accent designs after application. It makes the entire makeup experience more than just about applying products-it becomes an art form.
Lastly, storage can also be part of the fun! Utilize colorful containers or even small baskets to keep these tools organized. Labeling them with your child’s drawings or stickers can create excitement and encourage them to explore while also teaching them about organization.
By equipping your little makeup artist with creative and accessible tools, not only do you promote safe play, but you’re also nurturing their ability to express themselves. The journey of discovery with makeup becomes enriched, ensuring that every application session remains a memorable one!
Colorful and Natural Pigments to Experiment With
Experimenting with colorful, natural pigments can be an exciting and safe way for kids to engage with makeup creation. Traditional store-bought cosmetics often contain synthetic dyes that may cause skin irritation or allergic reactions. Instead, using ingredients from your kitchen or local garden offers a secure alternative while promoting creativity and learning about color mixing.
Common household items can easily transform into vibrant pigments. For instance, beet juice works wonderfully for a striking red hue, while turmeric provides a bright yellow shade. Dip a cotton swab or a small sponge into these liquids and apply them to the skin for a fun splash of color. Another popular option is using cocoa powder mixed with a tiny bit of oil for a brown tint, perfect for creating earthy tones. By making it a fun challenge, you and your child can explore the mixing of various pigments to discover new shades. For example, combining blue from blueberries and yellow from turmeric might yield interesting green tones, all while teaching them about primary and secondary colors in a playful setting.
Additionally, natural clay powders, such as pink kaolin clay, can be mixed with water to create a smooth paste that doubles as a foundation or blush. Encourage your little artist to personalize their makeup by adjusting the consistency to achieve lighter or bolder shades. Adding different oils, such as coconut or olive oil, can create a lovely sheen while also providing some skin benefits. As they experiment, remind your child of the joy in trial and error-it’s all part of the learning process!
Overall, engaging with these natural pigments is not just about having fun; it’s a fantastic opportunity for kids to learn essential skills such as measuring and mixing, enhancing their fine motor skills as they craft different products. Plus, these homemade alternatives are not just colorful and safe, but they can also foster creativity, giving children the chance to express themselves artistically while playing with makeup. By encouraging experimentation in a secure environment, you help promote both imagination and understanding of natural ingredients, setting a solid foundation for beauty exploration that prioritizes health and safety.
Simple Steps for Customizing Lip Balm
Creating homemade lip balm is a delightful project that not only nurtures kids’ creativity but also empowers them to make their own beauty products safely. With just a few ingredients from the kitchen, you can customize lip balm to suit individual preferences while keeping everything natural and fun. Kids will love experimenting with flavors, colors, and textures, making application uniquely theirs.
Start with a basic recipe to establish a foundation for customization. You will need:
- 2 tablespoons of beeswax (or candelilla wax for a vegan option): This ingredient provides the balm with structure and a smooth application.
- 2 tablespoons of a carrier oil (like coconut oil, olive oil, or almond oil): These oils nourish and moisturize the lips.
- Optional: A few drops of essential oil (like peppermint, vanilla, or lavender) for added scent and flavor.
To make your lip balm, follow these simple steps:
- Melt the Beeswax and Oil: In a small saucepan, gently heat the beeswax and chosen carrier oil over low heat until melted. Stir occasionally to combine. This process usually takes about 5 minutes.
- Add Color (Optional): If you’d like to infuse color, consider adding a small amount of natural coloring agents, such as beetroot powder for pink or turmeric for a golden hue. Start with a pinch and adjust to your liking.
- Flavor It Up: Now is the time to add your essential oil. Just a few drops will create a pleasant aroma. Mix well to ensure even distribution.
- Pour Into Containers: Use a small funnel or dropper to transfer the melted mixture into lip balm containers or tubes. Allow them to cool at room temperature until solid, which typically takes about 30 minutes.
- Label and Personalize: Once solid, let your kids personalize their lip balm containers with labels and designs, encouraging their creative expression. They can even brainstorm fun names for their new creations!
By guiding children through this process, they not only learn how to make a practical item but also gain an understanding of the ingredients used. This hands-on project cultivates essential life skills such as measuring, melting, and mixing, while instilling a sense of accomplishment and creativity. Always remember to supervise younger kids during the melting process and ensure all materials are safe for their use.
Making customized lip balm together can be a memorable bonding experience that fosters a love for creating and using natural products. Encourage imagination and exploration-who knows what delightful combinations will emerge from your kitchen that bring sparkly smiles to everyone’s lips!
Crafting Playful Eyeshadow with Everyday Items
Creating playful eyeshadow at home can be an exciting and colorful project that allows kids to express their creativity while using safe ingredients. It’s a fantastic way to introduce children to the world of DIY cosmetics, encouraging experimentation with different colors and textures without the harsh chemicals found in commercial products. With a few common household items, you can craft vibrant eyeshadows that are both safe and fun.
Begin by gathering some key ingredients that will act as your base. You’ll need:
- Talc-free cornstarch: This acts as a gentle base for the eyeshadow and helps it adhere to the skin.
- Cocoa powder or beetroot powder: These natural colors can provide lovely shades for your eyeshadow. Adjust the quantity to achieve desired intensity.
- A few drops of coconut oil: This will give the eyeshadow a creamy texture, making it easy to apply.
- Essential oils (like lavender or tea tree oil) (optional): Adding these can provide a nice scent and offer skin benefits, but ensure none trigger allergies.
To make the eyeshadow, follow these simple steps:
Mixing Your Eyeshadow
1. In a small bowl, combine approximately 2 tablespoons of cornstarch with 1 tablespoon of cocoa or beetroot powder. Use a spoon to mix well, creating an even base.
2. Gradually add coconut oil, mixing until you achieve a smooth, paste-like consistency. Aim for the texture of typical commercial eyeshadows-smooth enough to spread but not too runny.
3. If desired, add a drop or two of essential oil for fragrance. Mix thoroughly to ensure even distribution.
Storing Your Creation
Transfer the mixture into a small container. Mini jars or even cleaned old makeup containers can work well. Let it sit for a while to set properly.
Now, to apply the eyeshadow, encourage kids to use clean fingers or a soft makeup brush for even application on their eyelids. A little product goes a long way; applying a small amount will often suffice. Emphasize the importance of being gentle while applying makeup, which will help instill good habits as they explore their creativity.
Overall, making DIY eyeshadow is more than just a fun activity; it helps children learn about color mixing, the joy of creation, and how to care for their skin. It’s also an ideal activity for sleepovers or crafting parties, promoting cooperative play and imaginative expression. Remember, supervision is essential, especially for younger kids, ensuring they use safe materials and apply with care. With this playful project, you can make makeup time a delightful experience full of laughter and learning!
Creating DIY Face Paint for Dress-Up Fun
Transforming everyday moments into colorful adventures for your little ones can be as simple as creating homemade face paint. This DIY project not only sparks creativity but also provides a safe and engaging way for kids to express themselves while celebrating their imagination during dress-up play. Unlike commercial face paints that may contain harsh chemicals, homemade options use natural ingredients, ensuring they are gentle on sensitive skin and easy to wash off.
To get started, gather a few basic ingredients that you likely have on hand. The foundation of your face paint can include:
- Cornstarch: This acts as the main thickening agent and gives the paint a smooth texture.
- Water: Essential for mixing to achieve the desired consistency.
- Food coloring: A non-toxic way to add vibrant colors; you can use natural dyes like beet juice or turmeric for more unique hues.
- Vegetable glycerin: This optional ingredient helps the paint go on smoothly and adds moisture, making it less likely to dry out on the skin.
Simple Steps to Make Your Face Paint
1. In a mixing bowl, combine 1 cup of cornstarch with 1/2 cup of water. Stir until you achieve a thick, creamy consistency.
2. Gradually add food coloring a few drops at a time, mixing until you reach your desired shade. For pastel colors, use less food coloring; for vibrant shades, just add more.
3. If using vegetable glycerin, add a tablespoon at this stage to enhance the paint’s texture.
4. Once mixed well, transfer the paint into small containers-old makeup jars, ice cube trays, or even muffin tins work great.
Applying and Enjoying Face Paint
Encourage your kids to use clean applicators like foam sponges or soft brushes for application. Remind them to apply a thin layer to avoid clumping. Each application can be a fun opportunity to discuss their character or theme, whether they are becoming a fierce lion or a bright butterfly.
Be aware of skin sensitivities; always perform a patch test on a small area before applying the paint extensively. And when the fun is over, cleanup is easy-just use warm soapy water to wash it off.
Creating DIY face paint not only fosters creativity but also offers parents a great opportunity to engage with their children in art and play. It’s not just about transforming their appearances but also nurturing their imaginations in a safe, hands-on way. By crafting together, you’re making enduring memories while teaching them a valuable skill. So roll up those sleeves, unleash your inner artist, and enjoy the delightful mess of creativity!
Tips for Teaching Kids Makeup Application Skills
Teaching children how to apply makeup can be a delightful bonding experience while also instilling important skills. It’s essential to approach this with a focus on fun and self-expression rather than perfection. Start by creating a supportive environment where kids feel free to explore their creativity. Encourage them to try different colors and techniques without the fear of making mistakes; after all, it’s all about artistic expression!
To simplify the learning process, break down makeup application into clear, manageable steps. Begin with basic techniques like applying lip balm or blush to familiarize them with textures and colors. For example, show them how to use a clean fingertip or a soft sponge to apply a small amount of lip balm-about the size of a pea-gently smoothing it across their lips. This hands-on approach helps them learn while having fun.
Demonstrate proper hygiene and safety practices, emphasizing the importance of using clean tools and products made from safe ingredients. Teach them how to perform a patch test when trying new makeup to ensure they don’t have any allergic reactions. Letting them understand why these steps are crucial helps them develop good habits early on.
Finally, make their learning journey interactive by playing makeup games or role-playing different character looks. You could set up a “makeup salon” where they practice on family members or friends. This not only builds their skills but also reinforces social interaction and communication. Celebrate their creativity by encouraging them to showcase their looks to family members or during themed playdates, highlighting that makeup can be a fun way to express individuality and encourage imagination.
Storing and Organizing Homemade Makeup Supplies
Keeping homemade makeup supplies organized is essential not only for convenience but also for teaching kids about responsibility and creativity in their beauty projects. An organized space allows for easy access to materials, encouraging experimentation and making the creative process more enjoyable. Here’s how you can create a system that works best for your little makeup artists.
First, invest in clear storage bins or containers. Clear options allow kids to see their supplies at a glance, reducing the time spent searching for specific items. Use separate containers or sections for different types of products, such as lip balms, eyeshadows, and face paints. Labeling each container with a fun sticker or a colorful marker can make it exciting and easy for kids to remember where things go. This not only makes clean-up a breeze but also teaches organization skills.
Next, consider using a rolling cart or a small storage cart with multiple tiers. This setup is fantastic for easily moving supplies from one room to another, especially if kids want to craft in a different space. Each tier can hold different types of supplies or tools, such as brushes, sponges, and pigments. Plus, when more friends come over to play, you can roll the cart into a designated crafting area, turning it into an instant DIY makeup station.
Implementing a routine for maintaining the makeup area can also be beneficial. After each crafting session, encourage kids to put everything back in its place. Make it a fun game: they can race against the clock to see how quickly they can tidy up. This practice fosters a sense of ownership and respect for their creative space.
In conclusion, teaching kids to store and organize their homemade makeup supplies not only enhances their crafting experience but also instills valuable life skills. With fun and functional storage solutions, they can easily access their materials, promoting creativity and independence in their makeup projects.
Exploring the Benefits of Crafting Together
The joy of crafting together is a beautiful way to bond and create lasting memories with your children, especially when it comes to DIY makeup projects. Engaging in hands-on activities not only stirs creativity but also fosters collaboration and communication. When making makeup at home, you’re not just creating fun products; you’re enriching the quality of your time spent together. Whether it’s mixing colors, applying playful eyeshadows, or creating custom lip balms, every moment becomes an opportunity to share laughter and learn.
Moreover, crafting together can instill essential life skills in children. The process teaches them patience, as they wait for mixtures to set or for the right consistency; following instructions fosters responsibility, and experimenting with colors encourages problem-solving. For example, if a batch of lip balm turns out too hard, discussing what went wrong and brainstorming solutions can turn a small setback into a valuable learning experience. This hands-on approach not only enhances their crafting skills but builds their confidence in handling challenges.
Creating DIY makeup also sparks imaginative play. Kids love exploring new looks, and when they can customize their creations, their imaginations run wild. You might find them creating unique character looks for playdates or themed events, effectively transforming dull afternoons into storytelling adventures. Emphasizing the fun of applying makeup and dressing up inspires them to develop their creativity while learning about self-expression in an artistic way.
Lastly, crafting together paves the way for meaningful conversations about beauty and self-image. It opens a dialogue about what beauty means and the importance of using safe, natural ingredients. You can discuss the benefits of crafting their own products, such as knowing exactly what goes into them, making responsible choices, and understanding personal preferences. This knowledge builds a foundation for healthier attitudes as they grow, making the experience not just about makeup but a significant step in their personal development.
In essence, the act of crafting makeup together serves as a blend of creativity, education, and bonding, ensuring that your time spent together is precious and impactful.
Safety Guidelines for Homemade Makeup Use
When it comes to DIY makeup projects for kids, safety should be your top priority. Using safe ingredients is essential not only to prevent any adverse reactions but also to teach children responsible crafting practices. Always begin by applying a small amount of any product to a patch of skin (such as the inside of the wrist) and wait 24 hours to spot any potential allergic reactions before full application. This simple test can help avoid discomfort and ensure that the ingredients you’re using are suitable for their skin type.
Choosing Safe Ingredients
Opt for natural, non-toxic ingredients whenever possible. Common household items can often serve as great bases for DIY makeup. For instance, coconut oil can be used for moisturizing lip balms, and cornstarch is an excellent thickener for many formulations. Avoid common allergens like peanut oil or fragrances that may irritate sensitive skin. Always check labels and opt for organic products when you can, as these are less likely to contain harmful pesticides or chemicals.
Hygiene Matters
Keep everything clean and sanitized to prevent any contamination. Before starting your project, wash your hands thoroughly, and ensure that all utensils and containers are properly cleaned. Consider using disposable items (like plastic spoons or bowls) to minimize the risk of germs. And remember, makeup should never be shared between children as this can lead to the spread of germs or bacteria that may cause infections.
Storage Tips
Once your DIY creations are complete, proper storage is crucial to their longevity and safety. Store homemade products in airtight, labelled containers and keep them in a cool, dry place to prevent spoilage. Always check the consistency and smell before each use; if something appears off, it’s best to discard it. Make it a fun habit to check the makeup supplies together, teaching the kids the importance of taking care of their crafted items.
By following these guidelines, you not only ensure a fun and safe experience but also empower your kids to make informed choices about their creations. Teaching them about safety and hygiene can enrich their understanding of self-care while promoting creative expression through makeup.
Encouraging Imagination Through Makeup Play
Encouraging kids to express their creativity through makeup play can be a delightful experience, offering a unique way for them to explore their imagination while developing motor skills. By providing them with safe, homemade makeup, you invite them into a world where colors, textures, and playful designs come together to tell vibrant stories. This not only nurtures their artistic flair but also helps them build confidence and identity as they experiment with different looks and styles.
Start by creating a playful environment where creativity can flourish. You might set up a “makeup station” with mirrors, colorful containers for their DIY creations, and plenty of room to explore. In addition to makeup, include items like brushes, sponges, and even fun accessories like glitter or stickers to enhance their creations. Encouraging kids to design their own looks, whether it’s a fairy princess, a jungle explorer, or a magical creature, can ignite their imagination and allow for storytelling through makeup.
Introduce activities that enable kids to express their personalities. For instance, you can host a “makeup fashion show” where they can showcase their imaginative designs on themselves or even dolls. This interactive play fosters collaboration, as kids can work together to create themes or characters, further enriching their experience. You can guide them by asking questions like, “What colors make you feel happy?” or “How would you create a look for a superhero?” This not only makes the activity engaging but also allows for an exciting dialogue about creativity and self-expression.
Creative Ideas to Explore:
- Theme Days: Motivate kids to explore different styles each day, from vintage looks to futuristic designs.
- Story Inspired Looks: Let them choose favorite characters from books or movies and relate their look to the character’s personality.
- Color Mixing Experiments: Encourage them to mix different ingredients to discover new colors and textures for their makeup.
Emphasizing that makeup is just one of many ways to express who we are can also help normalize creative play. Remind them that it’s okay to make mistakes, as these often lead to the most imaginative solutions. By fostering this supportive atmosphere, you’re not only enhancing their creative skills but also teaching them to embrace their uniqueness and the beauty of exploration.
Frequently Asked Questions
Q: How can I make natural lip balm with kids?
A: To make natural lip balm with kids, you can use just three ingredients: 1 tablespoon of beeswax pellets, 1 tablespoon of coconut oil, and 1 tablespoon of shea butter. Melt them together in a double boiler, remove from heat, and pour into small containers. Let cool before use. This project is simple, safe, and fun!
Q: What are some easy makeup ideas for kids using household items?
A: Easy makeup ideas for kids using household items include using cocoa powder mixed with aloe vera gel as a bronzer, or food coloring diluted with water for face paint. These alternatives are fun and allow creativity while ensuring safety, as they use common kitchen ingredients.
Q: When is it safe for kids to start playing with makeup?
A: It’s safe for kids to start playing with makeup around ages 4-5, focusing on non-toxic, age-appropriate products. Engage them in DIY projects to promote creativity while ensuring that they understand the importance of safe application practices.
Q: How do I ensure the makeup I make for kids is safe?
A: To ensure homemade makeup is safe for kids, always use common kitchen ingredients that are non-toxic, like fruits and vegetable dyes. Avoid harsh chemicals, and perform a patch test first to check for allergies. This practice promotes safety in their creative explorations.
Q: What tools can kids use for applying makeup?
A: Kids can use fun tools like soft brushes, sponges, and their fingers for makeup application. Consider letting them create DIY applicators from clean cotton swabs or sponges. This encourages creativity while making the experience interactive and enjoyable!
Q: Are there any benefits to kids making their own makeup?
A: Yes, crafting makeup encourages creativity, fine motor skills, and can foster discussions about self-expression and safety. It also provides a bonding experience between parents and kids as they explore and learn about colors and creativity together.
Q: How can I store homemade makeup for kids?
A: Store homemade makeup in airtight containers in a cool, dry place. Label each container with the date and ingredients used. Using small jars or even recycled containers is a great way to keep the makeup organized and easily accessible for playtime.
Q: Where can I find recipes for homemade makeup projects for kids?
A: You can find recipes for homemade makeup projects in various online resources, craft books, or parenting blogs. These recipes often include simple ingredients and safe methods that align with fun, educational projects for kids. Check sections dedicated to DIY or crafts for inspiration!
The Conclusion
Now that you’ve discovered how to make makeup at home easily and safely for your kids, it’s time to get creative! Remember, this is all about fun and fostering your child’s imagination. Gather your ingredients and start experimenting with different colors and textures-they’ll love the hands-on experience, and you can enjoy some quality bonding time together. If you’re curious about more DIY projects, don’t miss our articles on homemade bath bombs and natural skincare for kids, which you can find linked in the description below.
Don’t forget to share your creations with us! We’d love to see how your homemade makeup turns out, so snap a photo and tag us on social media. Your feedback is important, so let us know in the comments what you found most enjoyable or any tips you might have for others. For more exclusive tips and fun projects delivered straight to your inbox, sign up for our newsletter today. Join our community and keep the inspiration flowing!